I guess I can't bitch too much about my stays not fitting: apparently I have actually dropped a few pounds since I draped them. I haven't been really trying, just sort of vaguely making a point not to overeat. Does it make that much of a difference?
It must, because it is period week so I am bloating, and a dress that makes it obvious where I am in my usual 5-pound shift is on the low end of that today. While I'm pre-Phantom Menace bloating, ergo my new low end must be lower than it was. So...win?
If only it felt more like a victory....
Although I really don't think I've lost enough to account for the missing 2 inch gap that I had planned in, so some of this is still on my patterning fail.
Monday, September 20, 2010
Sunday, September 19, 2010
Fuck
Stays are too big. I could lace them completely together. They are allowed to be an inch or two apart, so I was planning to do that in case I get all "I want to be hot for my wedding" inspired to lose some weight. But they already touch, and really it felt like without sufficient compression to perform their purpose anyway. So, I have to find a way to lose like 2-3 inchess of them.
Shit.
Fuck.
Goddamnit.
Motherfucker.
Cockgoblin.
Asscrack.
Balls.
Shit.
Fuck.
Goddamnit.
Motherfucker.
Cockgoblin.
Asscrack.
Balls.
Tuesday, September 7, 2010
Stays Making Part 1
I've been working on my stays lately. I blew up the pattern I got from my bible website and ran a test version in muslin. It didn't really fit my figure--I have a high waist and a short torso, so this didn't really surprise me. So then I went totally ghetto-modiste and self-draped by taping some muslin to my shoulders and drawing the lines where they needed to go. Yeah. Ghetto-fabulous! I worked a pattern off the draped lines and the general outline of the website pattern, and it was eh...more or less right. With a few adjustments based on the draped pattern I did a second pattern, and in muslin it seemed to fit.
There was nothing to do but try it in the real stuff, including the boning--the lovely thing about corsets is that you really can't tell if it's going to fit correctly until you "mock it up" in the real fabric with the boning. If it works, great, all you have to do is finish off the ends of the tunnels and add the lining and/or top fabric (in my case both) and trim. If it doesn't, you just wasted...however long it took you to cut out the pattern, baste it together, and sew 38 boning channels. In this case, about two 6- or 8-hour days and probably another football game or so (which isn't really 3 hours of work, even if it is 3 hours of clock time :).
Here's where I am: boning channels are sewn. Next step is to put the bones in, awl out some temporary (as in, I'm not sewing them, just creating them in the fabric) lacing holes, and wear the thing for a bit. That isn't going to happen before this weekend, as it's going to be an undertaking of at least a few hours. And I have to go buy an awl.
So here's what I've learned:
- Corsetieres were probably total stoners. Seriously. Sewing 74 (76 minus the 2 I did by hand) straight lines in a row got tedious on my machine...can't imagine doing it by hand.
- I can totally see why most of them were men. Coutil is fucking dense. It made my hand ache for two days to have done even that much work with it directly.
- I overcame my fear of sewing a crooked line on my machine after it took me 45 minutes to sew one tunnel (two parallel lines) by hand and dulled the needle I was using to near uselessness. I have so many better parts of this project to spend time on than taking 15 minutes (being very optimistic about aggregate speed after mastering the full learning curve) per line x 2 lines per channel x 38 channels...yeah, that's like 19 hours. Fuck. That.
- The seam on a pair of stays only extends down to the waistline. I know this seems like kind of simple and self-evident, but nowhere on the pattern or in the instructions did she make that clear. So my first test in muslin I made the mistake of sewing below the waist line. It took looking at one of her pictures against my test to understand what I'd done wrong. Seriously, where is my Sewing for Retards?! (Why do I feel like I'm writing it right now?)
- Proper tensioning is a necessity on a machine. Both upper and lower. I had to re-sew the first line of the first channel I sewed with my Brother like 6 times before I realized that it wasn't the upper tension or the stitch length that was wrong, but the fact that my lower thread hadn't caught its tensioner when I put in the new bobbin. Der...
- My boning fans do not look like hers. I hope they work anyway. I followed the process as she described it, but with the proportions my body necessitated on the patterns, the bones just didn't lay themselves out the same way.
- Buying plastic boning to cut to length was a good idea in terms of ease of cutting. Let's hope it doesn't make my stays so flimsy in those areas that I have to waste another $10 shipping to buy more boning. At least this time I'll (1) have all the lengths exact so I can just order what I need and (2) enough of the plastic left over that if I have to make another pair of stays ever I can cut mock-up lengths with that and order the steel when I'm sure the pattern is correct....
So there it is. Expect a picture fest of the various stages once I get the thing tried on so I can include that (as long as it's doing the job, of course...if it isn't, expect a post of just one single word).
Saturday, September 4, 2010
Nervous!
About to cut my first pieces of real fabric!
(Base layers for my stays, if you're curious...and if you're curious, yes, there is enough that I can fuck up and re-do completely.)
Wish me luck!
(Base layers for my stays, if you're curious...and if you're curious, yes, there is enough that I can fuck up and re-do completely.)
Wish me luck!
Tuesday, August 31, 2010
Football and Sewing
I had a moment of grand excitement last night when I realized that college football season is about to start. I am an avid football fan (college pretty much exclusively—I guess in the end I’m that much of a girl that I can’t do it more than one day a week!), by which I mean I tend to spend Saturdays watching anywhere between College Game Day and 1 ½ games (if both my alma matter and LSU are playing at the same time) to…well, an all-day affair that encompasses three full games and pieces of others. Yeah. Like I said, avid.
I will admit that sometimes, some weeks and even some seasons, I’m less into it all. But it occurred to me last night that spending all day Saturday in front of the TV watching football means I can also be spending all day Saturday sewing. I won’t have to feel like I’m missing time reading or that I should be doing housework or any number of other pursuits, with respect either to the watching of the greatest game or the sewing projects. If I do both, I’m multi-tasking, and that absolutely trumps any singular activity I could engage in instead.
So I’ll be watching all the games this season. And sewing while I do it. And if that’s not a Project Runway editorial combination of “hard” and “soft”/”masculine” and “feminine” to a hilarious degree, situationally speaking….
Now if I can just control my drinking-with-football habit, I've got it made!
Tuesday, August 24, 2010
Embroidery Part 1
Embroidery is both a surprise and not a surprise. It's not harder than I thought it would be, but it does take longer. Like I kind of expected to be about a third or halfway done with my pattern by the end of our drive home on Sunday, but I had, mm...maybe a sixth of it done? Maybe? Slow going! Now part of that may, I am willing to entertain the possibility that it might, have been because of the bumps and grinds of the road. But. Even taking that into account, not quite as fast as I expected.
But the stitching isn't hard, and I think my execution is as good as I could hope for. My design is (and this is another surprise) very obviously mine. I adapted some pictures of embroidery out of my Kyoto history of fashion tome, only because my domicile of guest abode had no internet--unexpected event--so I couldn't access any of the patterns I had found online. What I adapted looks so much like the way I always painted flowers in high school art it's uncanny. I guess I have a solid vision of the world, artisitically speaking, and it's still the same ten years later. I don't know whether to be pleased or dismayed. At least my drawing style translates decently well into basic embroidery shapes....
I'll post pictures after I'm done of the pattern, the pattern transferred onto the fabric, and the finished version. I don't want to jinx anything in the meantime, though. So no pictures for now.
Thursday, August 19, 2010
Embroidery Conundrum
I know I haven't gotten around to telling you all about making my chemise. I am like 80% I'm remaking it and that thoroughly demotivated me to talk about the trial version. I am about to embark on my embroidery journey. I am fairly confident this will come easily to me. I have always done well with abstract graphic designs in art classes and such, and I know the basic stitches and principles already--blew through a book on basic stitches in about 20 minutes because it was all "yes, I know how to do that."
Honestly, the bigger questions I had were the most simple of all:
how to thread the needle--by which I mean, does the embroidery thread run doubled or just with a tail at the top but leaving only one thread in the fabric (one with a tail up front)
do I knot the ends (mixed messages on this so I'm going with the Victorian site that said yes)
do I unwind my double-helix thread (if I want it thinner, which I do, then yes, I can)


Honestly, the bigger questions I had were the most simple of all:
So once I got those questions answered, it was time to decide what, exactly, I want to embroider. First embroidery project is the red dupioni silk that will cover my stays, because I can't find any black lace that does not look cheap and plastic to sew on as per my original plan. I have to embroider the fabric before I can cut it, and I am going on a road trip this weekend and expect at least one of the 6-hour drives to be in daylight and thus prime time to work by hand.
I was looking at styles of embroidery today, and I found two styles that I like, and I don't know which one to use.
 Blackwork Embroidery
Con - It is not period appropriate (it was popular in Elizabethan times but had fallen out of use by the 18th century)
Pro - It would mimic the lace-covered look I wanted originally
Con - It works better on gridded fabric, which mine is not
Pro - It is essentially outlining patterns rather than "drawing" with thread and filling them in, which is harder to keep looking nice (case in point 99% of the embroidery how-to books on the market)
Con - Its pattern would be exceedingly difficult to transfer by hand (and since my fabric is not on a grid it would have to be traced onto the fabric)
Pro - It is a graphic design style of repetition and interlocking that I have worked with and enjoyed working with on paper
Satin Stitch Embroidery (AKA regular filled embroidery)
Con - It would not give me the lace effect I wanted originally
Pro - It is period appropriate
Con - It will require an original freeform design
Pro - It is the kind of embroidery I'll have to use on his waistcoat so this would be good practice
Pro - It would be equally easy on non-gridded fabric as it would be on gridded
Pro - The pattern would be easier to transfer onto the fabric than a blackwork interlocking repetition pattern
Sigh. I think I just talked myself into the free-form satin-stitch. It's for the best, really it is...and I would be disappointed, I think, whichever way I chose. One path cuts off the other, simple as that, and I want both right now.
So. Now I just need to find a pattern that is appropriately dramatic, suited to the space and shape it will go, and work-able in a monochromatic design (black silk on red silk only). Maybe my artist mum can help me with that this weekend....
Here's some thoughts of things I like but why this exact pattern wouldn't work:
Middle section only - still too wideThe part on the coat - has no centerpiece
Would not work in black only but isn't that utter gorgeousness?
Sunday, August 8, 2010
Say Yes to the Dress
There's not much on the telly on lazy Sunday mornings, so I found myself watching Say Yes to the Dress: Atlanta this morning while I checked my email and took care of some things with my internet business concerns.

Wow. That show made me so glad we're doing things the way we are--I can totally see why a friend who recently got married told me that she just went to the bridal salon alone, without telling any of the females in her family she was going, and found the dress that she wanted. I couldn't handle having to arrange an expedition with like 5 other people so that no one in the close family or friend circuit got offended at being excluded, and then finding what I thought was my dress only to have a mother or grandmother shoot it down. Bad enough if they were just there for company or for advice, but even worse if the parents are actually paying for the wedding and therefore, perhaps, entitled to help with the planning of it.
To hell with that. We're paying for it ourselves, which is of course part of why it's so ghetto chic and down-scaled. Also my parents are just not that concerned about such things. I think they're also, well, not particularly taken with any romantic notions about our day. Like, when my brother got married, it was after a normal courtship time period of 2 or 2 1/2 years, and he's the older sibling, and so on. Enter me, after an 8-year relationship and living quite separated from my extended family--they're not even invited to the wedding separated--and in the meantime my brother's got two kids on the ground, so my parents just aren't feeling too concerned about my actual wedding. Which is a boon. I don't have to have anyone telling me what to do or even offering opposition to what he and I decide. Basically, we're doing exactly what we want--at least insofar as we can manage to arrange it with the options we have to choose from--and the people we invite can come, and enjoy, or not.
And the limited guest list also means that if every one of our close friends wants to make a long speech, no extraneous guests will be rolling their eyes and complaining later about how long the toasts were, because everyone who will be there are those who care the most for us and would be pleased at such toasts. Or simply too inebriated to care, and that works just as well. Also, given that our entire wedding budget is less than what most of these women are allowing for their dress alone, we won't be putting ourselves into debt (either literally or just in the figurative sense of owing parents emotional favors for paying for a huge gala) to get married. Considering that we thought really hard about just going back to Venice and speaking vows in an echoing empty church with no one to witness it but the stones, we're pretty happy with this as a compromise.
So basically what I'm saying is, all the wedding shows on TLC just reinforce to me how non-traditionally I think about such things at this point in my life!
Tuesday, August 3, 2010
Almost Met My Deadline!
I received the second shipment of boning--the 1/2 inch wide steels--in the mail yesterday (Monday), which means I didn't quite make my deadline for finishing my chemise. But I'm close! All I have left to do is hem the back neckline and the two sleeves. Basically, one movie/the last two episodes of Band of Brothers' worth of my time. Then, naturally, take pictures and post. Sneak preview: It kind of sucks and I may be re-doing it after all is said and done, but for now it's almost finish and worst case scenario I use this one anyway since no one will actually see it.
Stay tuned!
Stay tuned!
Monday, August 2, 2010
Maybe Brilliantly Played, Costume Designer
So I just bought a sketch pad that is almost big enough for designing on...will only have to tape 2 pieces together instead of 4 like I'd have had to with typing paper. Sigh. Why does no one sell butcher paper by the yard instead of 50 yard rolls or nothing?!
Anyway, I was looking at my images of Stanze's bodice, and I had a moment of synthesis that might make her dress even more brilliantly made than its look alone is. Observe the seaming:
See how the bodice is constructed of nothing but strips a few inches wide, except for the front panel? This could be about the tailoring so that it will fit all her contours perfectly, but....
First, I have learned in my research that fabric consumption was VERY conservative. You can see from a few extant old patterns how almost every scrap of fabric was used--very unlike today, which will tell you to buy an extra 2 yards in order to cut everything along the bias or something. Tailors in the old days did not give two shits about bias cuts or grain cuts or anything like that; they cared about fitting as many parts of their pattern onto that rectangle of fabric as they possibly could. Second, Stanze and Mozart were middle-class, rather than aristocratic or rich enough to be the equivalent, so I'm wondering if Stanze's bodice isn't constructed that way to imply it was made in part with scraps, as a money-saving device?
I will never know why the decision was made, of course, since there is not a book about the costuming of Amadeus, but if her dress was meant to suggest something about their financial situation and Stanze's thriftiness in taking a dress made with what might not have seemed like enough fabric...then that's brilliant.
Anyway, I was looking at my images of Stanze's bodice, and I had a moment of synthesis that might make her dress even more brilliantly made than its look alone is. Observe the seaming:


See how the bodice is constructed of nothing but strips a few inches wide, except for the front panel? This could be about the tailoring so that it will fit all her contours perfectly, but....
First, I have learned in my research that fabric consumption was VERY conservative. You can see from a few extant old patterns how almost every scrap of fabric was used--very unlike today, which will tell you to buy an extra 2 yards in order to cut everything along the bias or something. Tailors in the old days did not give two shits about bias cuts or grain cuts or anything like that; they cared about fitting as many parts of their pattern onto that rectangle of fabric as they possibly could. Second, Stanze and Mozart were middle-class, rather than aristocratic or rich enough to be the equivalent, so I'm wondering if Stanze's bodice isn't constructed that way to imply it was made in part with scraps, as a money-saving device?
I will never know why the decision was made, of course, since there is not a book about the costuming of Amadeus, but if her dress was meant to suggest something about their financial situation and Stanze's thriftiness in taking a dress made with what might not have seemed like enough fabric...then that's brilliant.
Saturday, July 31, 2010
Materials, Better Pictures
So here is the ridiculous pile of materials I have, plus patterns that may or may not be helpful in designing my dress's various components. Left third is my dress, right top third is his suit materials, lower right third is my stays base coutil and top fabric.
Here's his suit materials, linen lining and silk top fabric in a pile against a mass-market paperback for comparison. This isn't including his shirt fabric, which I haven't bought yet. I just need white cotton for that, no reason to buy it before I'm ready to sew it.
And finally a close-up of the dupioni silk for my stays so you can see how lustrous and red it is. It actually lookes a little darker in person, almost more of a maroon (as you can see in the pictures above), but in a camera flash it renders more of a true ruby color.

Here's his suit materials, linen lining and silk top fabric in a pile against a mass-market paperback for comparison. This isn't including his shirt fabric, which I haven't bought yet. I just need white cotton for that, no reason to buy it before I'm ready to sew it.

Here's a closer picture of my fabrics and patterns, since his were showcased a bit better in the original image I put up. The periwinkle is the petticoat, and the dark blue the over dress and bodice. Much darker than what Stanzie had--hers was periwinkle, and a light blue underskirt--but this will look better against my skin (I always look better in deep, rich colors, jewel tones I think is the term, than pastels).

And here's my fabric piled against the same book, stood upright, for comparison. Again silk, with some linen for lining (bodice and top skirt) and some cotton (petticoat).

And finally a close-up of the dupioni silk for my stays so you can see how lustrous and red it is. It actually lookes a little darker in person, almost more of a maroon (as you can see in the pictures above), but in a camera flash it renders more of a true ruby color.

Friday, July 30, 2010
Up Next: Embroidery
Every time I turn around there's something else I have to learn how to do. Sew with a machine. Sew by hand on a grand scale. Design the patterns myself. Sew boning tunnels. Sew in three dimensions for my hoops ("Yeah, well, I only see two!" "That sounds like a personal problem."). And now, fucking embroidering!
What?
Exactly. That was what I said. But there's two things happening here. First, I was trying to figure out how to decorate my stays, and the fact is that finding acceptable black lace might actually be more work than just embroidering something on the front panel would be. Second, he watched Amadeus again now that I've finally started sewing in earnest and pointed at the embroidery on the waistcoat and asked for it so sweetly that I just couldn't say no. So now I get to learn to embroider, too. Awesome.
At least, since I know how to sew by hand, this shouldn't actually be too much of a stretch--many of the stitches are similar, so it's simply a matter of having a different end than attaching two pieces of fabric to one another. Not such a leap that I can't handle it. (I can leap thick craft-books in a single bound! Ha. I am so making up a super-heroine/domestic goddess costume!)
 According to my project bible, embroidery would have been done on the material before it was cut. So I'll have to trace the pattern onto the material and then add the embellishments before I cut it. Which pretty much means that if I cut it wrong, he ain't getting no damned embroidery, after all. No way am I fucking with that twice. I'm less worried about the cuts on my stays than his waistcoat. Also the embroidery would be on a much smaller scale--1 panel as opposed to along the entire edge of...well, along the entire edge.
In the meantime, I am blessing the internet for its troves of old-fashioned embroidery patterns. I love the free exchange of information. So much better than having to check out 100 books from a library!
Thursday, July 29, 2010
On Hand Sewing - Lessons Learned, Part 1
Clearly, I enjoy making life hard for myself.
I have absolutely no doubt that there are plenty of beginning sewing guides equivalent to The Retard’s Guide to Sewing, or online forums, etc., that I could and probably should be perusing at this point in my career as a seamstress (or tailoress…or mantua maker…or modiste. The old words were so fun! Yay for historical romance novels that have taught me all of them!). But because none of the stupid itsy bitsy should-be-self-evident-but-apparently-aren’t-because-I’m-“special”-like-this pieces of information are on the surfaces of such sites/forums/books that I’ve perused, I’m basically reinventing the wheel and figuring out what generations of tailors learned long ago about things like how to stitch more quickly, and how to sew in straight lines, and how long to make your sewing thread, and how to tie off ends. (I’m still working on some of these.)
Over the last 10 days or so, I have been hand-sewing at my chemise. I learned how to make basting stitches super-fast by popping the thread in and out of the fabric like a sine wave and then pulling it through and pulling it tight. Voila! I can cover 10 inches in about five minutes.
Then I read a statistic from history-girl that said the shifts she examined had about 18-20 stitches per inch…my basting stitches had about 8. WAY too long! I tried making the movements in and out smaller, but in order to get them at that 18-20/inch scale I was working as slowly as I would be to just pull the thread in and out every time. So then I started doing about 6 short running stitches (which, like basting stitches, are just in and out of the fabric…a bit of the ole in-and-out, as Anthony Burgess might put it) at a time before pulling the thread tight. It pulls the fabric a bit, but for an underdress or completely hidden seam that’s okay—and it’s not a whole lot worse than putting in stitches one by one, anyway. The multi-stitch, then pull, method isn’t as fast the basting, but still faster than pulling the thread on every stitch.
So that took care of getting my stitches the right size and a reasonable work rate.
Then I noticed how atrociously out of alignment my seam was. In a general way, at a macro level I mean, it was fine—but up close…totally schizophrenic! Up and down, some at angles, some straight, and none of them consistent in size. Utter mess! So I wondered, what would happen if I drew myself a line and sewed along that? I tried it, and, boom! Even line! No more angles (for the most part). It even made my stitch lengths more even, and what the fuck difference would a line make to that? Note on this: Use a pencil! The thinnest-leaded pencil you can find! (1) Even a thin guideline can make an uneven row of stitches if you're drifting from the top of it to the bottom of it. (2) Pen will bleed into your thread after repeated pulls through it, and you don't want gray thread in a white fabric!
I was very proud of myself for thinking of this draw-a-line thing for about 10 seconds. Then I realized that it was probably the method of choice even for peasant housewives sewing their own shapeless sacks, and felt kind of dumb for not bothering to track down that information somewhere before starting. In many ways I’m still sewing like a child—literally, as someone who understands only the most basic of the mechanics but not the whys, the hows, and certainly not the means to refine them.
 Like I said. I’m reinventing the wheel. And being hard-headed and enjoying making this as difficult for myself as I possibly can, instead of just reading a lot of what I already do know in order to find out what I don't. Sewing for Retards, indeed….
 Wednesday, July 28, 2010
Boning
I wonder even as I type that title whether I’m about to get hits from people think this is that kind of website, lol!
If that’s why you’re here, sorry, I’m talking about the boning that goes into corsets. And stays, which is what I'm actually making, for those of you who are here for that. Despite stays usually being described as "18th century corsets," they aren’t quite the same thing and thus require different considerations for their boning…as I have learned the hard way. I will try to encapsulate my research and decision-making journey for you, to cover all the points without belaboring any of them.
Stays, as I said above, are not like corsets, in that they are not shaping the body the same way. As I understand it, stays are mainly about creating a slimmer front waist—which makes the side view thicker—and creating the “apples on a tray” look for the bosom. They should not obstruct breathing or press any internal organs around. This is because they are a rigid cast without much bend, designed to move the body in essentially one direction (back) instead of two (back and down). The Victorian corsets are made to conform to a woman’s curves and compress all of them, in every direction. They’re the ones that deserve the bad rap for health reasons, and they’re the ones that can be laced to interfere with breathing.
The distinction of design and purpose becomes important when you consider what kind of boning to use. For a Victorian style corset, you need boning that is more flexible and adaptable to the curvature of the body. For stays, to a large extent that seems to defeat the point, since it’s not supposed to be flexible but a rigid garment. Let me also explain that there are two ways to make stays: fully boned, or half-boned. Fully boned stays are literally stays that have boning sewn into channels that cover pretty much every inch of their surface area.

Half-boned stays actually range from half-boned to two-thirds-boned, but they have some space between the boning channels.

I am planning to make half-boned, because they seem easier to make—3-piece pattern vs. 5, and significantly fewer boning channels to sew. (Let’s hope I don’t make them and decide I should have gone for fully boned and have to start over!)
The easy part was choosing the fabric—basically, every site I found about stays/corset-making agreed that coutil cotton is the best for the base layers, and I let chance and opportunity decide my cover layer of ruby dupioni silk. I’m going to trim it with black satin on the edging, but I’m still debating whether and how to decorate the top layer of fabric.
The hard part has been the boning. Plastic or steel boning is preferred for stays—not spiral steel which might be acceptable or even preferred for the side boning in Victorian corsets—and is sold in ¼ and ½ inch widths in the United States. My conundrum has been whether to use plastic or steel or a mix, and which width.
I finally settled on a mix of steel and plastic because while I’m not “the most generously endowed or queen-sized” of figures that require all steel, I’m also not quite the “slim-figured” that can get away with only plastic in a half-boned version. (I think fully boned all plastic would work for me.)
Then I had a hell of a time trying to decide if I wanted to buy pre-cut and pre-tipped steel boning, or buy a length of steel and cut my own pieces as I needed them. The drawback of the pre-cut lengths was that I would have to know in advance what lengths I would need, and given that I’m not working off a hard-and-fast pattern, the lengths are going to be somewhat…nebulous until I'm actually sewing the boning in. The problem with cutting my own steel is that it would mean having to also buy steel cutters of some stripe and having to tip my own custom cuts, because raw-edged steel could too easily wear through the fabric. In the end I decided I’d rather spend an extra $10 buying all the sizes around what I think I’ll need in pre-cut lengths, to be sure I get the right length in there somewhere, rather than investing $30-50 in the tools when I may never build another corset again.
The final decision I had to make in terms of materials was what width to buy for a mixed-boning half-boned pair of stays. I had ¼ inch recommended from someone who makes corsets (that is, Victorian corsets) because the ½ inch is “really stiff and inflexible,” and the ¼ inch recommended from someone who has made fully boned stays. The website I’m drawing my pattern from recommends “10 mm,” which if you know anything about metric conversions is right smack in the middle of ¼ and ½ inch. So, I decided to buy ¼ inch because that was 2 recommendations for it. It arrived two days ago, and I took one look at it and went back to the website to order some ½ inch steels, as well.
What was the problem?
Well, essentially, ¼ inch is really damn thin. I had ordered about 50 pieces all told (I’ve seen fully boned stays that had 100-120 bones, and by yard-lengths I was in the right range of 10-12 yards for half-boned stays), 36 in plastic and about 25 in steel. I was thinking that would be enough, but looking at it…there was no way that 12.5 inches of boning (1/4 inch width per piece x 50 pieces laid out side-by-side) were going to properly mash my body. That’s about a third of my actual circumference (maybe a bit more, but not by a “statistically significant” amount), and one-third-boned stays just aren’t going to cut it. Consider that the same number of ½ inch bones would be 25 inches—or 2/3 of my circumference. Yeah.
So I immediately ordered the same number of steel bones, in the same lengths as the first set, except twice as wide. Note to anyone out there thinking of making a corset or stays: overbuy your boning the first time! Shipping was not any cheaper for my rinky-dink purchase than it was for my boning plus tape plus cording plus hoop boning, so I am kicking myself for wasting that $10 shipping charge when if I’d been properly paranoid in the first place, I could have just bought the same lengths of ½ inch steels to be safe and had everything I needed in one go.
As to how I’m planning to utilize my materials: I figure I will put the ½ inch boning in the front “busk” and the middle back, which are the parts most in need of a good firm bone structure. Then I’ll use the ½ inch pieces where I can in the side channels, and either flank each piece of ½ inch boning with a piece of ¼ inch to the sides, or intersperse the thinner bones into the space between the wider bones. If my steel cuts aren’t long enough for some of the channels, I can always do two or three ¼ inch bones sewn right next to each other like they are in fully-boned stays and create the equivalent of a wider bone with the smaller ones.
Maybe I’m not giving the thinner boning enough credit here, but it just seemed so narrow and unlikely to make a dent in my statuesque frame. And if I end up with some crazy pastiche of boning, well, if it’s doing the job I need it to do, I frankly don’t care. My aim, as I’ve said before, is not historical recreation but historical suggestion. As long as it gives my body the proper silhouette, I don’t really care how anachronistic the piece itself is!
I’m intending to keep very detailed construction notes on the stays. I know I haven’t gotten up anything about my chemise yet—working on that! Just got a new camera and haven’t loaded the picture software to my computer yet—but needless to say I didn’t finish it before my boning arrived. Revised deadline: before the second package of boning arrives!
If that’s why you’re here, sorry, I’m talking about the boning that goes into corsets. And stays, which is what I'm actually making, for those of you who are here for that. Despite stays usually being described as "18th century corsets," they aren’t quite the same thing and thus require different considerations for their boning…as I have learned the hard way. I will try to encapsulate my research and decision-making journey for you, to cover all the points without belaboring any of them.
Stays, as I said above, are not like corsets, in that they are not shaping the body the same way. As I understand it, stays are mainly about creating a slimmer front waist—which makes the side view thicker—and creating the “apples on a tray” look for the bosom. They should not obstruct breathing or press any internal organs around. This is because they are a rigid cast without much bend, designed to move the body in essentially one direction (back) instead of two (back and down). The Victorian corsets are made to conform to a woman’s curves and compress all of them, in every direction. They’re the ones that deserve the bad rap for health reasons, and they’re the ones that can be laced to interfere with breathing.
The distinction of design and purpose becomes important when you consider what kind of boning to use. For a Victorian style corset, you need boning that is more flexible and adaptable to the curvature of the body. For stays, to a large extent that seems to defeat the point, since it’s not supposed to be flexible but a rigid garment. Let me also explain that there are two ways to make stays: fully boned, or half-boned. Fully boned stays are literally stays that have boning sewn into channels that cover pretty much every inch of their surface area.
Half-boned stays actually range from half-boned to two-thirds-boned, but they have some space between the boning channels.
I am planning to make half-boned, because they seem easier to make—3-piece pattern vs. 5, and significantly fewer boning channels to sew. (Let’s hope I don’t make them and decide I should have gone for fully boned and have to start over!)
The easy part was choosing the fabric—basically, every site I found about stays/corset-making agreed that coutil cotton is the best for the base layers, and I let chance and opportunity decide my cover layer of ruby dupioni silk. I’m going to trim it with black satin on the edging, but I’m still debating whether and how to decorate the top layer of fabric.
The hard part has been the boning. Plastic or steel boning is preferred for stays—not spiral steel which might be acceptable or even preferred for the side boning in Victorian corsets—and is sold in ¼ and ½ inch widths in the United States. My conundrum has been whether to use plastic or steel or a mix, and which width.
I finally settled on a mix of steel and plastic because while I’m not “the most generously endowed or queen-sized” of figures that require all steel, I’m also not quite the “slim-figured” that can get away with only plastic in a half-boned version. (I think fully boned all plastic would work for me.)
Then I had a hell of a time trying to decide if I wanted to buy pre-cut and pre-tipped steel boning, or buy a length of steel and cut my own pieces as I needed them. The drawback of the pre-cut lengths was that I would have to know in advance what lengths I would need, and given that I’m not working off a hard-and-fast pattern, the lengths are going to be somewhat…nebulous until I'm actually sewing the boning in. The problem with cutting my own steel is that it would mean having to also buy steel cutters of some stripe and having to tip my own custom cuts, because raw-edged steel could too easily wear through the fabric. In the end I decided I’d rather spend an extra $10 buying all the sizes around what I think I’ll need in pre-cut lengths, to be sure I get the right length in there somewhere, rather than investing $30-50 in the tools when I may never build another corset again.
The final decision I had to make in terms of materials was what width to buy for a mixed-boning half-boned pair of stays. I had ¼ inch recommended from someone who makes corsets (that is, Victorian corsets) because the ½ inch is “really stiff and inflexible,” and the ¼ inch recommended from someone who has made fully boned stays. The website I’m drawing my pattern from recommends “10 mm,” which if you know anything about metric conversions is right smack in the middle of ¼ and ½ inch. So, I decided to buy ¼ inch because that was 2 recommendations for it. It arrived two days ago, and I took one look at it and went back to the website to order some ½ inch steels, as well.
What was the problem?
Well, essentially, ¼ inch is really damn thin. I had ordered about 50 pieces all told (I’ve seen fully boned stays that had 100-120 bones, and by yard-lengths I was in the right range of 10-12 yards for half-boned stays), 36 in plastic and about 25 in steel. I was thinking that would be enough, but looking at it…there was no way that 12.5 inches of boning (1/4 inch width per piece x 50 pieces laid out side-by-side) were going to properly mash my body. That’s about a third of my actual circumference (maybe a bit more, but not by a “statistically significant” amount), and one-third-boned stays just aren’t going to cut it. Consider that the same number of ½ inch bones would be 25 inches—or 2/3 of my circumference. Yeah.
So I immediately ordered the same number of steel bones, in the same lengths as the first set, except twice as wide. Note to anyone out there thinking of making a corset or stays: overbuy your boning the first time! Shipping was not any cheaper for my rinky-dink purchase than it was for my boning plus tape plus cording plus hoop boning, so I am kicking myself for wasting that $10 shipping charge when if I’d been properly paranoid in the first place, I could have just bought the same lengths of ½ inch steels to be safe and had everything I needed in one go.
As to how I’m planning to utilize my materials: I figure I will put the ½ inch boning in the front “busk” and the middle back, which are the parts most in need of a good firm bone structure. Then I’ll use the ½ inch pieces where I can in the side channels, and either flank each piece of ½ inch boning with a piece of ¼ inch to the sides, or intersperse the thinner bones into the space between the wider bones. If my steel cuts aren’t long enough for some of the channels, I can always do two or three ¼ inch bones sewn right next to each other like they are in fully-boned stays and create the equivalent of a wider bone with the smaller ones.
Maybe I’m not giving the thinner boning enough credit here, but it just seemed so narrow and unlikely to make a dent in my statuesque frame. And if I end up with some crazy pastiche of boning, well, if it’s doing the job I need it to do, I frankly don’t care. My aim, as I’ve said before, is not historical recreation but historical suggestion. As long as it gives my body the proper silhouette, I don’t really care how anachronistic the piece itself is!
I’m intending to keep very detailed construction notes on the stays. I know I haven’t gotten up anything about my chemise yet—working on that! Just got a new camera and haven’t loaded the picture software to my computer yet—but needless to say I didn’t finish it before my boning arrived. Revised deadline: before the second package of boning arrives!
Saturday, July 24, 2010
Which Hoops?
One of the blogs I've got in my Vendors/Resources list is about a graduate student putting together a museum collection of original reproductions to represent the fashion of the mid-18th-century. At one point she is questioning what type of hoops to make, pocket hoops (the smaller version of the full-on hip cages) or the oval hoop. I have wondered this myself after I saw an example of the oval hoop in the only book I have (thus far!) purchased for this project:

The Kyoto Institute's Fashion: from the 18th to the 20th Century was a Barnes & Noble discount rack buy that seemed like fate, as it appeared pretty much the first trip to a bookstore I took after settling on these costumes as our wedding theme. It's a pretty awesome book, actually, and gives examples of paintings and woodcuttings of the time and then extant specimens of the depicted style. I would have loved it more if it were only 18th and 19th centuries, but beggars can't be choosers, and all that.
Anyway, it was in this book that I first saw an example of oval hoops to make me question what type I wanted.
If you are less familiar with hoops, here's an example of their most extreme, which would have been reserved for formal court dress (and, if Les Pacte de Loup is to be believed, really expensive brothels) by the period I'm working in:

Here's the more modest style (pocket hoops)again:

Here's, in contrast, the oval hoop:

I am still uncertain what I want to do...perhaps I will make both pocket hoops and the oval and see which looks better? I will have enough of the hoop boning--it was only available in a 12-yard roll, when I expect to need no more than about 3 yards for any given set of hoops. So I'll have enough material to make two types, if I deem it necessary.
My concern is not about historical authenticity, the way the grad student's was. Mine is (1) making sure I achieve the proper visual effect, and (2) figuring out which will be the easiest to wear. By which I mean, which (if either) will allow me to pee unassisted, which will be more comfortable to walk and to sit in, which will be more comfortable under 3 layers of skirts all day.
I have considered not even using hoops--case in point, my label on this dress in my costume pix file was "What You Can Accomplish with Tulle" (I re-saved and labeled it here for copyright reasons, as it is a Charles Anastase dress in the vein of Alice in Wonderland).

But I actually think that hoops would be more comfortable to wear than that many layers underneath, and I'm not sure it would support the dress at the top well enough to create a graceful drape all the way to the floor. So I'm going to make hoops of some sort...I just don't know which yet! The oval seems like it will hold everything away from my legs a little better and thus allow for me to (maybe) hitch up my skirts unassisted, and it also seems like it wouldn't interfere with walking or sitting the way pocket hoops might, because there wouldn't be anything directly against my legs. But...(there's always a "but" in this endeavor; I have already learned that!)...I don't have anything like a pattern for an oval hoop (whereas I have a real, that is, commercial, pattern for the pocket hoops) and grad student replicator said they were more complicated to make.
Conundrums, conundrums. Thoughts?
The Kyoto Institute's Fashion: from the 18th to the 20th Century was a Barnes & Noble discount rack buy that seemed like fate, as it appeared pretty much the first trip to a bookstore I took after settling on these costumes as our wedding theme. It's a pretty awesome book, actually, and gives examples of paintings and woodcuttings of the time and then extant specimens of the depicted style. I would have loved it more if it were only 18th and 19th centuries, but beggars can't be choosers, and all that.
Anyway, it was in this book that I first saw an example of oval hoops to make me question what type I wanted.
If you are less familiar with hoops, here's an example of their most extreme, which would have been reserved for formal court dress (and, if Les Pacte de Loup is to be believed, really expensive brothels) by the period I'm working in:
Here's the more modest style (pocket hoops)again:

Here's, in contrast, the oval hoop:
I am still uncertain what I want to do...perhaps I will make both pocket hoops and the oval and see which looks better? I will have enough of the hoop boning--it was only available in a 12-yard roll, when I expect to need no more than about 3 yards for any given set of hoops. So I'll have enough material to make two types, if I deem it necessary.
My concern is not about historical authenticity, the way the grad student's was. Mine is (1) making sure I achieve the proper visual effect, and (2) figuring out which will be the easiest to wear. By which I mean, which (if either) will allow me to pee unassisted, which will be more comfortable to walk and to sit in, which will be more comfortable under 3 layers of skirts all day.
I have considered not even using hoops--case in point, my label on this dress in my costume pix file was "What You Can Accomplish with Tulle" (I re-saved and labeled it here for copyright reasons, as it is a Charles Anastase dress in the vein of Alice in Wonderland).

But I actually think that hoops would be more comfortable to wear than that many layers underneath, and I'm not sure it would support the dress at the top well enough to create a graceful drape all the way to the floor. So I'm going to make hoops of some sort...I just don't know which yet! The oval seems like it will hold everything away from my legs a little better and thus allow for me to (maybe) hitch up my skirts unassisted, and it also seems like it wouldn't interfere with walking or sitting the way pocket hoops might, because there wouldn't be anything directly against my legs. But...(there's always a "but" in this endeavor; I have already learned that!)...I don't have anything like a pattern for an oval hoop (whereas I have a real, that is, commercial, pattern for the pocket hoops) and grad student replicator said they were more complicated to make.
Conundrums, conundrums. Thoughts?
(No) Commercial Patterns
 Apparently the 18th-century "rococo" period is not really all that popular among amatuer/hobby-costumers. I say this because there are very few commercial patterns for the time period, and those that do exist are either full-on courtly formal sack dresses (pictured at right) or American Revolution styles that aren't at all what the French fashionistas were wearing. Or fashionistos, for that matter--I have yet to find a single men's costume that even remotely approaches what I need for his. This dearth of variety in women's costume is in English only...there is one German site that offers a wider variety of styles including the one I am making. But since I don't speak German, for my robe a la polonaise I instead have 3 different costume patterns that may or may not in the end contribute to my dress (one for the petticoat, one for the split skirt, one for the bodice and sleeves).
Essentially, then, I am designing my own. Okay, far, far, FAR from really, because I have 2 different books for each of us and a fabulous website that goes into a lot of detail about how to make the clothing of the time. It will be more useful for his, because the women's robe on that website is the sack dress most typical of the time, which is not what I'm making. But the site is where I'm getting my chemise and stays patterns, and taking her construction advice if not the pattern shapes for my dress. Her patterns are developed from old tailoring guides and museum pieces--which is pretty much the same (in the sense of equivalent, not the actual same) source material as the books I have are pulling from.
I'm both excited and terrified at the prospect of creating my own designs. Terrified because, going back to the whole, I'm a beginner and likely to have enough trouble putting real patterns together thing: what the fuck am I thinking?! Excited because, my dress will be completely and entirely customized to my figure, which is not at all in the standard way (broad shoulders, high waist, large-boned and heavy-muscled, long-limbed without the attendent lankiness), and because when I've daydreamed about making costumes it's designing my own fanciful shit and then realizing it, not just placidly recreating someone else's daydream.
I've taken as many screen-shots off Stanze's dress as I can to see how they seamed it, and I'm planning to draw out a to-scale view of my own body and use my math skillz to measure out each seam relative to my size. I never thought I'd be combining both my Art I class with arithmetic, but trust me to find a way, lol. At least I have experience blowing things up from a small scale to a large on a grid, thanks to a couple different Art I projects, and I have enough skill with a pencil to draw the lines right. I'll have to do it blowing up the patterns from the book(s)/website for his, anyway, so it's not actually that far a stretch to staring at how the costumer for the movie put Stanze's bodice together and then copying it onto paper.
...Right?
Wednesday, July 21, 2010
Chemise - Part 1
The chemise (shift) is the most basic and most under of undergarments for women of the time period. (And a lot of others. They get taken off a lot in historical romance novels, lol.) It is worn underneath the stays, against the skin, to both absorb sweat so the stays don't need to be washed--only aired--and to prevent the possibly rougher fabric of the stays from chafing the skin.
I am using for my chemise a basic pattern, and sewing it completely by hand in order to practice stitches and get a feel for how long things take. Material is white cotton broadcloth, very thin and frays ridiculously, but also--very thin. If my nipples object after a practice wear I might swap out the bodice for a softer fabric, but I was mostly going for expediency and affordability in case I had to start over from scratch because I irretrievably fucked something up. In terms of material length, it is coming to my knees; I bought 3 yards of fabric, which was really about a yard too much, so now I've got extra patterning material.
What I have learned so far: sewing is not intuitive for me. I have managed, in the process of attaching the sleeves (and thus far only the sleeves!) to:
I am undaunted by this fact. There are a lot of things in life that are counterintuitive until you really understand how they work. Also, knowing is half the battle--and now I know. It's much better for me to make this kind of mistake on the garment no one will see than on my actual dress, for so many reasons. Well, okay, just two--no one will see it, and this material is cheap enough and readily available enough that if it wasn't fixable I could buy more, unlike my silks. Thus why I'm starting with my chemise.
I just got my deadline for it today, too: the materials I am still lacking for sewing my stays and hoops--basically, the boning--are en route via UPS with an ETA of Monday July 26. Good thing I can hand sew in front of the TV!
Note: I will post pictures of each stage of the process once I've finished it, so keep an eye out for "Chemise - Part 2" hopefully by the end of the weekend!
I am using for my chemise a basic pattern, and sewing it completely by hand in order to practice stitches and get a feel for how long things take. Material is white cotton broadcloth, very thin and frays ridiculously, but also--very thin. If my nipples object after a practice wear I might swap out the bodice for a softer fabric, but I was mostly going for expediency and affordability in case I had to start over from scratch because I irretrievably fucked something up. In terms of material length, it is coming to my knees; I bought 3 yards of fabric, which was really about a yard too much, so now I've got extra patterning material.
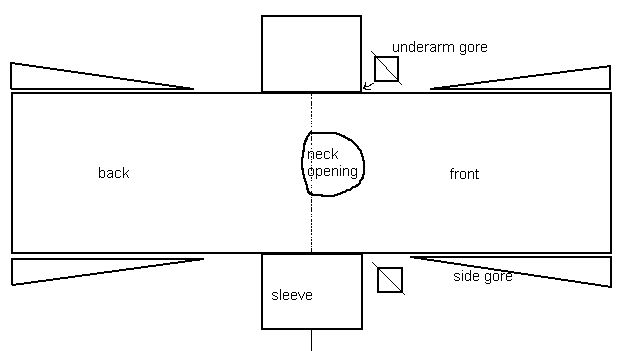
What I have learned so far: sewing is not intuitive for me. I have managed, in the process of attaching the sleeves (and thus far only the sleeves!) to:
- sew one sleeve completely shut whilst trying to affix the underarm gusset
- sew one sleeve into the shoulder inside out
- Fail to sew the opposite sleeve onto the shoulder in the same way despite attempting to do so
- Not realize when I had sewed the sleeve on as I wanted to
I am undaunted by this fact. There are a lot of things in life that are counterintuitive until you really understand how they work. Also, knowing is half the battle--and now I know. It's much better for me to make this kind of mistake on the garment no one will see than on my actual dress, for so many reasons. Well, okay, just two--no one will see it, and this material is cheap enough and readily available enough that if it wasn't fixable I could buy more, unlike my silks. Thus why I'm starting with my chemise.
I just got my deadline for it today, too: the materials I am still lacking for sewing my stays and hoops--basically, the boning--are en route via UPS with an ETA of Monday July 26. Good thing I can hand sew in front of the TV!
Note: I will post pictures of each stage of the process once I've finished it, so keep an eye out for "Chemise - Part 2" hopefully by the end of the weekend!
Tuesday, July 20, 2010
Hand Sewing
I am not exactly an ace with a sewing machine. I have had one for at most six months—less if you count from the time I actually took it out of the box. I have yet to complete a garment using it. (Although, I have started a simple dress. And actually now that I say that, I remember I have sewn one thing, a basic slip of 2 pieces of cloth that I literally put two seams in and hemmed. Added the button—and buttonhole—by hand.)
Using my machine isn’t hard, exactly; but I find that my level of precision is, well, vague, at best.
 So when I saw on the main website I am using as my resource guide for this project a page about hand sewing that amounted to a challenge—Why not try it? It’s more authentic and it might be easier than you think!—I didn’t take it as a challenge. I took it as a safety net. “Why NOT try it?” I thought. I mean, I’m not planning to be stupid-dedicated to hand sewing for the sake of hand sewing. I don’t expect that I’ll actually be willing to, say, blind-hem stitch a 6-yard hem on my petticoat. (Note: I will if the blind-hem stitch feature on my machine sucks. I am that much of a perfectionist. But I’m trying the machine first on that hem!)
But. I’m not going to force myself to machine everything but the most complex of seams, either. In fact, I’m likely going to sew more by hand than with my Brother.
Why? Because, frankly, I’m more confident sewing by hand. It's the only way I've ever sewn, what little sewing I've actually done (mending and buttonholes, and the occasional replacement hem). But I am comfortable doing it, which is apparently more than many people who learn by machine-sewing. My hand-sewn stitches may not be the prettiest, but they are sturdy—and most of the time they won’t be seen, anyway. More importantly—well, equally importantly with the fact that not too many of them will be seen, because there is a serious aesthetic consideration in all of this—I know they will be right. I can be precise with my hands in a way that I am not sure I can be yet with my machine.
It’s kind of a vicious overlap: I’ll never get precise enough with my machine if I don’t practice, and yet I’m not willing to risk a costume of this level of importance to practice. Perhaps if I make it to the Renaissance Festival this year, with enough advance planning to make costume(s). I could do some simple dress(es) for that, and use only the machine except for the things not even experts would machine, and learn.
And in the meantime, I’m just planning to hand sew everything but the longest, most simple of the seams and hems. I’m starting by making my chemise entirely by hand, to get my stitching in top form and to get a time estimate for how long each piece will take…but that’s another post!
Monday, July 19, 2010
Complete Dossier
Before I start into posts specific to individual pieces of this project, I thought it might be fun for any of you who are keeping track of my progress to know exactly what I've gone on the table. So here it is, my rococo dressing list:
His
His
- Pants (knee breeches)
- Waistcoat
- Jacket (justaucorps, and God do I love that word for it)
- Shirt
- Stock
Mine
- Chemise
- Stays (corset, but the term for the period is stays)
- Pocket hoops (AKA considérations)
- Petticoat (and possibly also and under-petticoat, depending on how it drapes over the hoops)
- Dress, meaning bodice and overskirt
- Fichu
- Sash

We will be acquiring from outside sources the following items:
- His tricorner
- My awesome, totally-gonna-win-the-Derby-Day-competition hat
- His wig
- Shoes for both of us
- Stockings for both of us
We already know where we're commissioning my hat from, but the others are still at large. (So if any of you happen to know where we can get high quality historical reproductions, please chime in, lol.)
So there it is. I currently have seven months to finish everything. Let's hope I don't need to start wishing he proposed even sooner!
Sunday, July 18, 2010
On Materials and Mood Fabrics
I'm not sure if it's a universal piece of advice, but from everything that I've seen on websites about sewing and from everything I've heard from people I know who do it, the cardinal rule for beginners seems to be "don't choose a project that's too hard for your skill set." Basically the opposite of my intentions with this costume project, which is clearly Go Big Or Go Home.
I am essentially a novice at sewing. My godmother used to sew, and I helped her make me a Renaissance Fair dress one fall when I was in high school--by help I mean I cut the pieces and did the hand-finishing, and watched her do the machine sewing--but that's as close as I've ever been to a project of this scope. I can re-attach buttons in a way that they aren't coming off even in a knife-fight, and I have hand-hemmed pants that I decided to make into capris, and mended rips in a shirt. And that's actually been it for me for sewing. But I have always wanted to have the skills and equipment to make fabulous outfits for Occasions, so this wedding project is just an impetus to jumpstart this idealized passion into an actual hobby. Also, I watch a lot of Project Runway, and if those people have learned how to sew and design, there's no way I can't, as well. I am a smart girl, and not entirely tactiley helpless. I understand there will be a learning curve, but I also believe I have enough tenacity, exposure if not experience, and common sense to make it through with an outcome I am proud of.
One thing I am hell-bent on is making sure that, beginner or not, these costumes look nice. By that, I suppose I mean luxe. The one costume wedding I've witnessed had a dress that, while lovely, looked, well, like polyester. (You're looking at the lady in red on the right. She was the bride--we just happened to be outside the bar when their pirate wedding, complete with Naval chaplain and crossed-sword salute, sprung up around us. I daresay watching this charming and casual proceeding may have planted the germ of our own wedding theme two years ago.)

I don't want to look like I'm in a modern fabric aping (poorly) the finery of yesteryear. These are both our wedding clothes and costumes that we intend to use for years; we want them to be right. So it was frustrating to me to go to the local fabric stores and come up empty-handed because they had nothing like what I was looking for, and realize that I would have to go elsewhere for my needs. Which seems impossible in a city like New Orleans, that there is not a great fabric store here. Note: There is an upscale fabric shop I have not visited, mostly because their prices are high and I had an opportunity to go to New York. I will at some point check them out and see whether they are worth frequenting for later projects/emergency replacements.
So instead of buying cheap fabric, going on the internet and buying what I could only hope were the right colors and fabric weights, or getting gouged for it, I went--as I mentioned--to The City (as all the people I met in Jersey, where I was staying, kept calling it) and, like any good PR junkie, went to Mood Fabrics.
That was a fabulous experience! The building was hilariously obscure--all it had was the address, no sign that it was a business building as opposed to apartments, nothing on the wall outside; obviously the building shot on the show is from the LA location! If you didn't know it was there, like if you just went to the Garment District and thought you could stumble onto it, you can't. Plenty of other stores, yes, and next time I go to NYC and have a couple hours to kill maybe I'll explore some of the many, many other fabric stores I passed. But Mood? You have to know it's there. Since I had the address, I walked right in and only stopped to verify with the business sign discreetly on the wall that I was in the right place before ringing for the elevator. The elevator man (WTF, right? EXACTLY) took me right to the third floor, and the staff on the floor left me alone until I had stopped wandering from section to section and started pulling out fabrics to compare. The man who cut for me was extremely helpful; he helped me to find several color options I hadn't seen, and I'm pretty sure gave me a price break on one of the fabrics because he didn't have the $18 silk (only the $30) in the color I needed, but yet $18 was the highest per-yard cost I had when my purchase was rung up.
And going in to a store like that was the best move I could have made, to wait and consider the colors in person (vs. buying on the internet), because being able to hold the prospective colors for jacket against waistcoat against pants settled me on them.


I am essentially a novice at sewing. My godmother used to sew, and I helped her make me a Renaissance Fair dress one fall when I was in high school--by help I mean I cut the pieces and did the hand-finishing, and watched her do the machine sewing--but that's as close as I've ever been to a project of this scope. I can re-attach buttons in a way that they aren't coming off even in a knife-fight, and I have hand-hemmed pants that I decided to make into capris, and mended rips in a shirt. And that's actually been it for me for sewing. But I have always wanted to have the skills and equipment to make fabulous outfits for Occasions, so this wedding project is just an impetus to jumpstart this idealized passion into an actual hobby. Also, I watch a lot of Project Runway, and if those people have learned how to sew and design, there's no way I can't, as well. I am a smart girl, and not entirely tactiley helpless. I understand there will be a learning curve, but I also believe I have enough tenacity, exposure if not experience, and common sense to make it through with an outcome I am proud of.
One thing I am hell-bent on is making sure that, beginner or not, these costumes look nice. By that, I suppose I mean luxe. The one costume wedding I've witnessed had a dress that, while lovely, looked, well, like polyester. (You're looking at the lady in red on the right. She was the bride--we just happened to be outside the bar when their pirate wedding, complete with Naval chaplain and crossed-sword salute, sprung up around us. I daresay watching this charming and casual proceeding may have planted the germ of our own wedding theme two years ago.)
I don't want to look like I'm in a modern fabric aping (poorly) the finery of yesteryear. These are both our wedding clothes and costumes that we intend to use for years; we want them to be right. So it was frustrating to me to go to the local fabric stores and come up empty-handed because they had nothing like what I was looking for, and realize that I would have to go elsewhere for my needs. Which seems impossible in a city like New Orleans, that there is not a great fabric store here. Note: There is an upscale fabric shop I have not visited, mostly because their prices are high and I had an opportunity to go to New York. I will at some point check them out and see whether they are worth frequenting for later projects/emergency replacements.
So instead of buying cheap fabric, going on the internet and buying what I could only hope were the right colors and fabric weights, or getting gouged for it, I went--as I mentioned--to The City (as all the people I met in Jersey, where I was staying, kept calling it) and, like any good PR junkie, went to Mood Fabrics.
That was a fabulous experience! The building was hilariously obscure--all it had was the address, no sign that it was a business building as opposed to apartments, nothing on the wall outside; obviously the building shot on the show is from the LA location! If you didn't know it was there, like if you just went to the Garment District and thought you could stumble onto it, you can't. Plenty of other stores, yes, and next time I go to NYC and have a couple hours to kill maybe I'll explore some of the many, many other fabric stores I passed. But Mood? You have to know it's there. Since I had the address, I walked right in and only stopped to verify with the business sign discreetly on the wall that I was in the right place before ringing for the elevator. The elevator man (WTF, right? EXACTLY) took me right to the third floor, and the staff on the floor left me alone until I had stopped wandering from section to section and started pulling out fabrics to compare. The man who cut for me was extremely helpful; he helped me to find several color options I hadn't seen, and I'm pretty sure gave me a price break on one of the fabrics because he didn't have the $18 silk (only the $30) in the color I needed, but yet $18 was the highest per-yard cost I had when my purchase was rung up.
And going in to a store like that was the best move I could have made, to wait and consider the colors in person (vs. buying on the internet), because being able to hold the prospective colors for jacket against waistcoat against pants settled me on them.

There are six fabrics there, and the gold and the two purples (on the right) go together, while the white and the periwinkle and the dark violet that you really can't see in this light go together. Interestingly, the two trim fabrics (the gold brocade and the white) were actually the first pieces I picked out. Perhaps they had to be, or perhaps they were simply the easiest two to choose because they were the most specific and therefore had the fewest choices. I will say this about Mood, it was nearly overwhelming for me as a consumer. There were just so many choices, and I am not sure I could have chosen well without having those two pieces to start from. I also honestly didn't know the second thing about what I needed. I had tried to research fabric weights and types, but it wasn't that clear when I was looking at the rolls of fabric and trying to decide. In the end I think I did well, certainly for my experience level and definitely within budget (under my upper limit, at that!), but it was nerve-wracking. And wonderfully exciting. It made the whole undertaking start to seem real.
For those of you following along for a sewing project perspective, I wish I could tell you what I actually bought, but I don't think these silks were specifically labeled--the four main ones came from the same section, and it was unmarked. I know they weren't Georgette, or charmeuse, or duchess satin, or watered silk, because those were labeled. The white is a cotton/silk blend and very filmy. The brocade is a brocade. The others are all slinky and thin. Probably too thin, but Mood didn't have thick silks there. Perhaps heavy silks don't exist anymore (since getting back from this trip, I've seen historical recreation websites complaining about the lack of historical-type silks so I feel less like an idiot for getting fabrics that are too thin). I will have to compensate by lining with stiff fabric or even using lining and interlining to stiffen them so they hold a shape, especially for his coat and maybe also my bodice and the top skirt. The pants and my petticoat, I think, will be fine simply with a lining.
I will take a picture of all my materials at some point, because it's quite funny to see how much fabric I have bought for this project. Maybe overbought, but I figured that would be better than the alternative! Since the Mood expedition, I have also bought locally material for my chemise, his shirt and stock, the linings and/or interlinings, and my stays (okay, actually most of their materials are internet purchases, except that I did find a beautiful duiponi silk at Hancock's fabrics that I am covering them with). But since the finishing fabrics have the most glamour, I wanted to show off what I'm working with (ultimately) before I start posting pictures of my chemise and stays--the only parts I've actually started.
And in the meantime, this is the best encapsulation of "What I did in New York":

Wednesday, July 14, 2010
My Mardi Gras Wedding
I am getting married on Tuesday, March 8, 2011. For most of America, that date will have a vague significance of "Fat Tuesday" only because it is the day before Ash Wednesday and the start of Lent. Few places actually celebrate Mardi Gras for itself. I happen to live in one of them. And, yes, I'm getting married right in the thick of it.
We didn't choose the date in spite of the holiday; we chose it because of the holiday. We're not native to this region, but since we moved here, Mardi Gras has become our favorite season. We love the revelry, and the excitement, and the community, and the craziness. The costumes. The fact that he'll be able to remember our anniversary (because we're calling Mardi Gras Day our anniversary, whenever it falls on the calendar), which will make our anniversary more special to him, for falling on his favorite holiday. The obvious truth that when we have an anniversary to celebrate, we can go somewhere really fantastic and watch their Mardi Gras--Rio, Venice, Paris.
We are getting into the spirit of the holiday with our wedding plans. The guest list is limited to immediate family and closest friends; basically the people who know us best and won't merely not judge us for getting married by a man dressed as Jean Lafitte and quite possibly still drunk from the night before, but will in fact actively enjoy such a scene. I've probably offended 2/3 of my family by doing this, and a good many friends as well, but ultimately we want a day that truly celebrates us. Having a family reunion with all its inherent awkardness, or the attendent stress of trying to catch up with friends we haven't seen since college, seemed like it would only detract from that celebration. Also, if we had more than 40 guests, we couldn't use the only space we could find that didn't require us to either belong to the church or take 10 weeks of premarital counseling. (We've been together for nearly 8 years; we know this is for the rest of our lives.) We're also getting into the revelry of Mardi Gras in our theme: it's not a Mardi Gras wedding, it's a masquerade wedding.
Here's how that happened. I warned him, when we moved here, that I was going to start making costumes like crazy, because I have always loved playing dress-up for Halloween, the Renaissance Festival, anything. He said "okay" and moved me here anyway; then he said, "I've always wanted to have a few styles so if you get good at sewing can you make me...?" One of those styles was 18th century gentleman--basically, Mozart from the movie Amadeus. His purple and gold get-up, so it could be worn tailgating at LSU games.

I love Stanze's matching day dress (see my profile picture). We've been daydreaming of wearing such full-on period clothes from Louisiana's founding years, complete with paniers for me and a white wig for him, since we lived in Baton Rouge. So when we finally decided to get married, and we were searching for something that would be meaningful to him so the day wasn't just for me, and settled on Mardi Gras, it seemed very logical to add costumes. And to add, specifically, those costumes. If they're done right, they will provide us years of enjoyment with tailgating and parading on Mardi Gras Day--and every additional wearing is both a reminder of our wedding day, and a justification of whatever it costs to make them, versus a dress that I wear literally once in my lifetime and then leave to rot in a closet or a box with scented sachets in the attic.
We're pretty laid-back, low-key people, so our wedding plans are simple. We're not bothering with flowers, as the space is already decorated with antiques (maximum decoration on our part might be providing tulle for them to drape over the ceiling to cover their Vegas-wedding-shack style dollar bills); we have 13 households getting my self-designed and home-printed invitations and a current maximum of 35 guests, so even if it goes up a few people it's still within our 40; we're not doing a formal reception but champagne and cake right after the ceremony to end our formal revels; then we and anyone who wants to come are going to second-line out of the chapel and into the hysteria of Mardi Gras Day in the French Quarter and party till the police drive everyone out at midnight.
This blog is meant to be a place for me to express my frustrations, anxieties, triumphs, and challenges throughout the planning and executing process. It will for the most part be about my sewing projects, as that is the bulk of my time and energy in this whole scenario, but I will occasionally talk about the other parts. And I will probably include headless photos for those of my friends (all of you, lol) who are not here to help me drape or fit or cut, or to laugh at me when I bring a piece of my dress out with me to the bar on Saturday afternoon to sew away at what can only be accomplished by hand while we sip our sweating drinks and watch the river roll.
If I don't know you, feel free to take this journey with me. I'm chronicling it as much to help me keep track of my rookie costuming mistakes as to help me remember my wedding planning with clarity; perhaps one track, or the other, of my learning curve can help you on your own journey. And if I do know you, thanks for caring enough to come by!
We didn't choose the date in spite of the holiday; we chose it because of the holiday. We're not native to this region, but since we moved here, Mardi Gras has become our favorite season. We love the revelry, and the excitement, and the community, and the craziness. The costumes. The fact that he'll be able to remember our anniversary (because we're calling Mardi Gras Day our anniversary, whenever it falls on the calendar), which will make our anniversary more special to him, for falling on his favorite holiday. The obvious truth that when we have an anniversary to celebrate, we can go somewhere really fantastic and watch their Mardi Gras--Rio, Venice, Paris.
We are getting into the spirit of the holiday with our wedding plans. The guest list is limited to immediate family and closest friends; basically the people who know us best and won't merely not judge us for getting married by a man dressed as Jean Lafitte and quite possibly still drunk from the night before, but will in fact actively enjoy such a scene. I've probably offended 2/3 of my family by doing this, and a good many friends as well, but ultimately we want a day that truly celebrates us. Having a family reunion with all its inherent awkardness, or the attendent stress of trying to catch up with friends we haven't seen since college, seemed like it would only detract from that celebration. Also, if we had more than 40 guests, we couldn't use the only space we could find that didn't require us to either belong to the church or take 10 weeks of premarital counseling. (We've been together for nearly 8 years; we know this is for the rest of our lives.) We're also getting into the revelry of Mardi Gras in our theme: it's not a Mardi Gras wedding, it's a masquerade wedding.
Here's how that happened. I warned him, when we moved here, that I was going to start making costumes like crazy, because I have always loved playing dress-up for Halloween, the Renaissance Festival, anything. He said "okay" and moved me here anyway; then he said, "I've always wanted to have a few styles so if you get good at sewing can you make me...?" One of those styles was 18th century gentleman--basically, Mozart from the movie Amadeus. His purple and gold get-up, so it could be worn tailgating at LSU games.
I love Stanze's matching day dress (see my profile picture). We've been daydreaming of wearing such full-on period clothes from Louisiana's founding years, complete with paniers for me and a white wig for him, since we lived in Baton Rouge. So when we finally decided to get married, and we were searching for something that would be meaningful to him so the day wasn't just for me, and settled on Mardi Gras, it seemed very logical to add costumes. And to add, specifically, those costumes. If they're done right, they will provide us years of enjoyment with tailgating and parading on Mardi Gras Day--and every additional wearing is both a reminder of our wedding day, and a justification of whatever it costs to make them, versus a dress that I wear literally once in my lifetime and then leave to rot in a closet or a box with scented sachets in the attic.
We're pretty laid-back, low-key people, so our wedding plans are simple. We're not bothering with flowers, as the space is already decorated with antiques (maximum decoration on our part might be providing tulle for them to drape over the ceiling to cover their Vegas-wedding-shack style dollar bills); we have 13 households getting my self-designed and home-printed invitations and a current maximum of 35 guests, so even if it goes up a few people it's still within our 40; we're not doing a formal reception but champagne and cake right after the ceremony to end our formal revels; then we and anyone who wants to come are going to second-line out of the chapel and into the hysteria of Mardi Gras Day in the French Quarter and party till the police drive everyone out at midnight.
This blog is meant to be a place for me to express my frustrations, anxieties, triumphs, and challenges throughout the planning and executing process. It will for the most part be about my sewing projects, as that is the bulk of my time and energy in this whole scenario, but I will occasionally talk about the other parts. And I will probably include headless photos for those of my friends (all of you, lol) who are not here to help me drape or fit or cut, or to laugh at me when I bring a piece of my dress out with me to the bar on Saturday afternoon to sew away at what can only be accomplished by hand while we sip our sweating drinks and watch the river roll.
If I don't know you, feel free to take this journey with me. I'm chronicling it as much to help me keep track of my rookie costuming mistakes as to help me remember my wedding planning with clarity; perhaps one track, or the other, of my learning curve can help you on your own journey. And if I do know you, thanks for caring enough to come by!
Subscribe to:
Posts (Atom)